REST APIs are stateless, so server does not store any information about the client. So we can not authorize the rest application in a traditional way. How does a server knows if the user is authenticated user or not? In this situation the Json Web Token (JWT) saves the day.
JSON Web Tokens are an open, industry standard RFC 7519 method for representing claims securely between two parties. Source: jwt.io
💻 Source code : https://github.com/rd003/NetRefreshTokenDemo
Let’s understand how it works?
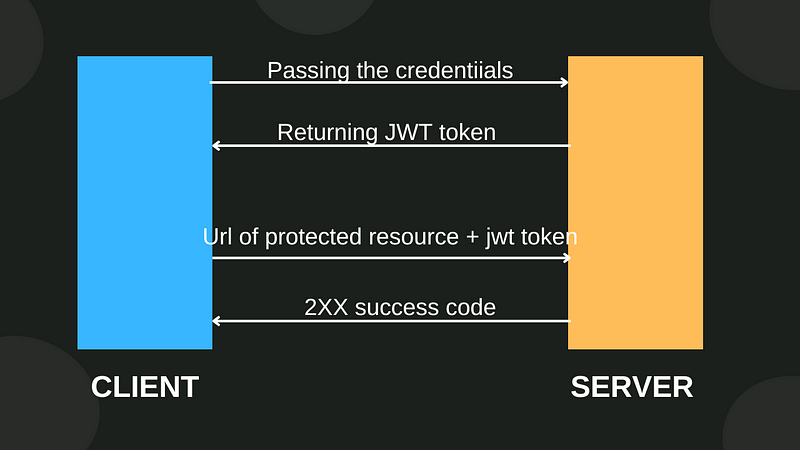
First, user passes the valid credential to the server through the API(eg. Login api). Server generates the JWT and returns it to the client. JWT contains information like Name, Email, Role etc. about the User. To access the protected resource , user have to pass the JWT in the Authorization header.
Refresh token
Usually, JWTs are short-lived (mostly 10 to 15 minutes). To mitigate security risks we make them short lived. If a token is stolen, attacker have less time to use it. However, this creates a problem — users have to authenticate themselves in every 10 to 15 minutes. It is bothersome to enter credentials again and again. In such situations, refresh tokens come in handy.
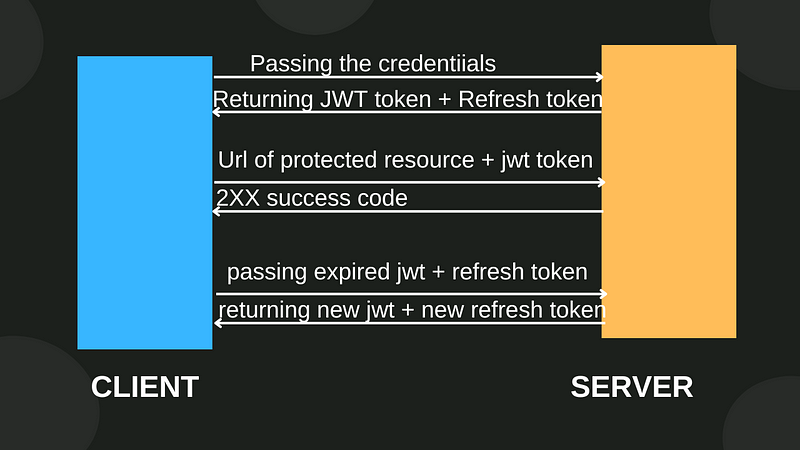
First, the user uses an authentication API (e.g., login) to authenticate itself and enters the valid credentials. The server validates the client and returns the JWT and refresh token. Refresh tokens are long-lived. The client has to store the JWT and refresh token. If the JWT expires, the client needs to use the refresh endpoint and pass the stored expired JWT and the refresh token. In return, the client gets the latest JWT and refresh token. Every time the JWT expires, the client has to use the refresh endpoint until the refresh token expires.
Tools and tech used
- VS code (text editor) with c# dev kit extension
- PostgreSql running in docker
- .NET 9
- Entity Framework Core
- Identity
Creating an application using NET CLI
First and foremost create a new controllers API project in .net. Run these commands in a sequence.
# create new solution file
dotnet new sln -o NetRefreshTokenDemo

cd NetRefreshTokenDemo

# create new controllers api project
dotnet new webapi --use-controllers -o NetRefreshTokenDemo.Api

# registering NetRefreshTokenDemo.Api project to the solution
dotnet sln add .\NetRefreshTokenDemo.Api\

# open the current folder in the vs code
code .
Nuget packages
Run these commands in a sequence to install the required nuget packages.
# An EF package for the postgresql
dotnet add package Npgsql.EntityFrameworkCore.PostgreSQL

# A package need to work with the ef migrations
dotnet add package Microsoft.EntityFrameworkCore.Design

# Packages for the identity
dotnet add package Microsoft.AspNetCore.Identity.EntityFrameworkCore

# A package to generate the jwt tokens
dotnet add package Microsoft.AspNetCore.Authentication.JwtBearer
Connection String
Add the connection string in the appsettings.json .
"ConnectionStrings": {
 "default": "Host=localhost; Port=5432; Database=NetRefreshTokenDemo;
 Username=postgres;Password=your_strong_password"
 }
Models
Create a new folder named Models. Then create a new class namedApplicationUser in the Models folder.
// Models/ApplicationUser.cs

public class ApplicationUser : IdentityUser
{
 public string Name { get; set; } = string.Empty;
}
When we use the aspnetcore identity, lots of classes related to identity gets generated during the migration. AspNetUsers is One of them, which have lots of default columns. If you want to store additional information about the user, you need to create a class named ApplicationUser and inherit the class named IdentityUser. We are adding just one property(Name) to the class. If you want to store more information , you can add more properties. Now a new column named Name will be added to the AspNetUsers.
We need one more model to store the refresh token info.
// Models/TokenInfo.cs

public class TokenInfo
{
 public int Id { get; set; }

    [Required]
    [MaxLength(30)]
    public string Username { get; set; } = string.Empty;

    [Required]
    [MaxLength(200)]
    public string RefreshToken { get; set; } = string.Empty;

    [Required]
    public DateTime ExpiredAt { get; set; }

}
Create a new class namedAppDbContext within the Models folder.
using Microsoft.AspNetCore.Identity.EntityFrameworkCore;
using Microsoft.EntityFrameworkCore;

namespace NetRefreshTokenDemo.Api.Models;

public class AppDbContext : IdentityDbContext<ApplicationUser\>
{
    public AppDbContext(DbContextOptions<AppDbContext> options) : base(options)
    {

    }

    public DbSet<TokenInfo> TokenInfos { get; set; }

}
Now, we need to register the AppDbContext in the Program class.
string connectionString = builder.Configuration.GetConnectionString("default");

builder.Services.AddDbContext<AppDbContext\>(options =>
 options.UseNpgsql(connectionString));

// For Identity
builder.Services.AddIdentity<ApplicationUser, IdentityRole\>()
 .AddEntityFrameworkStores<AppDbContext\>()
 .AddDefaultTokenProviders();

// Use these middlewares before app.MapControllers()

app.UseAuthentication();
app.UseAuthorization();

app.MapControllers() // existing code
Jwt Related configuration
Add following lines in the appsettings.json.
"JWT": {
 "ValidAudience": "https://localhost:7014",
 "ValidIssuer": "https://localhost:7014"
 }
ValidAudience
Determines the valid recipient of the token. The value https://localhost:7014 determines that only an application running on https://localhost:7014 can consume the token. It determines the aud claim in the token. e.g.
{
  "aud": "https://localhost:7014"
}
ValidIssuer
Defines the issuer of the token. This is usually the URL or identifier of the authentication server (e.g., an identity provider like Azure AD, IdentityServer, or your custom auth service). It adds the iss claims in the token payload.
{
  "iss": "https://localhost:7014"
}
We also need to store secret-key. We are not going to store it in the appsettings. We will store it in the secret manager, which is a good choice for local development. But for the production you need to use something like azure key vault or its other cloud counter parts.
First of all we need to initialize the user-secrets in our project. Make sure you are in the projects directory.
cd NetRefreshTokenDemo.Api
Now initialize the user-secrets.
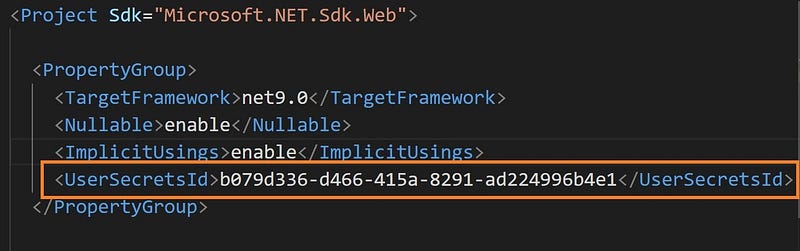
dotnet user-secrets init
To verify, open the NetRefreshTokenDemo.Api.csproj file.
Follow the command below, to store the jwt-secret in user-secrets.
dotnet user-secrets set "JWT:secret" "your-32-characters-long-super-strong-jwt-secret-key"
You can find the secrets in following location.
In windows
%APPDATA%\\Microsoft\\UserSecrets\\<user_secrets_id>\\secrets.json
In mac/linux
~/.microsoft/usersecrets/<user_secrets_id>/secrets.json
Now add the following configuration in Program.cs.
// Authentication
builder.Services.AddAuthentication(options =>
{
 options.DefaultAuthenticateScheme = JwtBearerDefaults.AuthenticationScheme;
 options.DefaultChallengeScheme = JwtBearerDefaults.AuthenticationScheme;
 options.DefaultScheme = JwtBearerDefaults.AuthenticationScheme;
})
 .AddJwtBearer(options =>
 {
    options.SaveToken = true;
    options.RequireHttpsMetadata = false;
    options.TokenValidationParameters = new TokenValidationParameters
    {
        ValidateIssuer = true,
        ValidateAudience = true,
        ValidAudience = builder.Configuration["JWT:ValidAudience"],
        ValidIssuer = builder.Configuration["JWT:ValidIssuer"],
        ClockSkew = TimeSpan.Zero,
        IssuerSigningKey = new SymmetricSecurityKey(Encoding.UTF8.GetBytes(builder.Configuration["JWT:secret"]))
    };
 });
Migration Commands
Run the following migration commands in a sequence.
dotnet ef migrations add init

dotnet ef database update
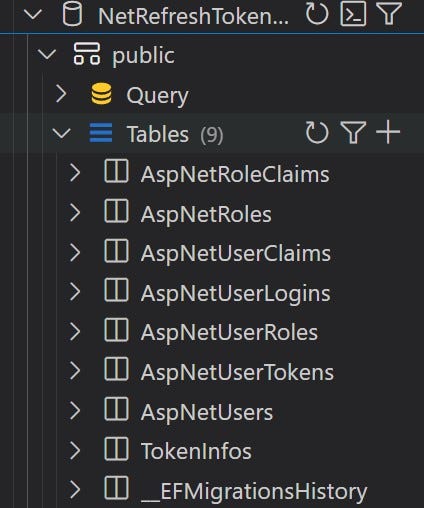
At this period to time, our database has been generated and look like this.
Role Constants
Create a folder named Constants, within the folder create a class named Roles.
// Constants/Roles.cs
namespace NetRefreshTokenDemo.Api.Constants;
public class Roles
{
 public const string Admin = "Admin";
 public const string User = "User";
}
Seeding admin data
Since there won’t be any API for creating an admin, we will create an admin when our application runs for the first time. Create a folder named Data. In this folder, create a new class named DbSeeder.
// Data/DbSeeder.cs
namespace NetRefreshTokenDemo.Api.Data;
public class DbSeeder
{

}
Within a DbSeeder class, create an asynchronous static method named SeedData.
public class DbSeeder
{
 public static async Task SeedData(IApplicationBuilder app)
 {
 }
}
Now, we will implement the SeedData method. In this method we checks if there is any user is in the database or not. If there won’t be any user in the database, we will create a user with username admin@gmail.com. In this way we will create an admin record when our application runs.
I have added comments, so code is self explanatory.
public static async Task SeedData(IApplicationBuilder app)
{
    // Create a scoped service provider to resolve dependencies
    using var scope = app.ApplicationServices.CreateScope();

    // resolve the logger service
    var logger = scope.ServiceProvider.GetRequiredService<ILogger<DbSeeder>>();

    try
    {
        // resolve other dependencies
        var userManager = scope.ServiceProvider.GetService<UserManager<ApplicationUser>>();
        var roleManager = scope.ServiceProvider.GetService<RoleManager<IdentityRole>>();

        // Check if any users exist to prevent duplicate seeding
        if (userManager.Users.Any() == false)
        {
            var user = new ApplicationUser
            {
                Name = "Admin",
                UserName = "admin@gmail.com",
                Email = "admin@gmail.com",
                EmailConfirmed = true,
                SecurityStamp = Guid.NewGuid().ToString()
            };

            // Create Admin role if it doesn't exist
            if ((await roleManager.RoleExistsAsync(Roles.Admin)) == false)
            {
                logger.LogInformation("Admin role is creating");
                var roleResult = await roleManager
                  .CreateAsync(new IdentityRole(Roles.Admin));

                if (roleResult.Succeeded == false)
                {
                    var roleErros = roleResult.Errors.Select(e => e.Description);
                    logger.LogError($"Failed to create admin role. Errors : {string.Join(",", roleErros)}");

                    return;
                }
                logger.LogInformation("Admin role is created");
            }

            // Attempt to create admin user
            var createUserResult = await userManager
                  .CreateAsync(user: user, password: "Admin@123");

            // Validate user creation
            if (createUserResult.Succeeded == false)
            {
                var errors = createUserResult.Errors.Select(e => e.Description);
                logger.LogError(
                    $"Failed to create admin user. Errors: {string.Join(", ", errors)}"
                );
                return;
            }

            // adding role to user
            var addUserToRoleResult = await userManager
                            .AddToRoleAsync(user: user, role: Roles.Admin);

            if (addUserToRoleResult.Succeeded == false)
            {
                var errors = addUserToRoleResult.Errors.Select(e => e.Description);
                logger.LogError($"Failed to add admin role to user. Errors : {string.Join(",", errors)}");
            }
            logger.LogInformation("Admin user is created");
        }
    }

      catch (Exception ex)
    {
        logger.LogCritical(ex.Message);
    }

}
Make sure to add these namespaces at the top of the file.
using Microsoft.AspNetCore.Identity;
using Microsoft.EntityFrameworkCore;
using NetRefreshTokenDemo.Api.Constants;
using NetRefreshTokenDemo.Api.Models;
Now, we need to call the seeding method in the Program.cs .
// Program.cs

// Existing code removed for brevity

await DbSeeder.SeedData(app); // Call this method to seed the data

app.Run();
Run the project
Run the project with the following command.
dotnet run
Once the project is run successfully, stop it by pressing ctrl+c in the terminal. At this point the default admin user is created.
Signup & Login models
Create a new folder named DTOs within the Models folder. Within the folder named DTOs, create a new class named `SignupModel``.
using System.ComponentModel.DataAnnotations;

namespace NetRefreshTokenDemo.Api.Models.DTOs;

public class SignupModel
{
    [Required]
    [MaxLength(30)]
    public string Name { get; set; } = string.Empty;

    [Required]
    [MaxLength(30)]
    [EmailAddress]
    public string Email { get; set; } = string.Empty;

    [Required]
    [MaxLength(30)]
    public string Password { get; set; } = string.Empty;

}
Within the folder named DTOs, create a class named LoginModel.
using System.ComponentModel.DataAnnotations;

namespace NetRefreshTokenDemo.Api.Models.DTOs;

public class LoginModel
{
    [Required]
    public string Username { get; set; } = string.Empty;

    [Required]
    public string Password { get; set; } = string.Empty;

}
AuthController
Within the folder named Controllers, create a controller named AuthController.
using Microsoft.AspNetCore.Http;
using Microsoft.AspNetCore.Mvc;

namespace NetRefreshTokenDemo.Api.Controllers;

[Route("api/[controller]")]
[ApiController]
public class AuthController : ControllerBase
{
}
Inject the ILogger, UserManager and RoleManager services to the controller.
using Microsoft.AspNetCore.Identity;
using Microsoft.AspNetCore.Mvc;
using NetRefreshTokenDemo.Api.Models;

namespace NetRefreshTokenDemo.Api.Controllers;

[Route("api/[controller]")]
[ApiController]
public class AuthController : ControllerBase
{
    private readonly UserManager<ApplicationUser> _userManager;
    private readonly RoleManager<IdentityRole> _roleManager;
    private readonly ILogger<AuthController> _logger;

    public AuthController(UserManager<ApplicationUser> userManager,
    RoleManager<IdentityRole> roleManager, ILogger<AuthController> logger)
    {
        _userManager = userManager;
        _roleManager = roleManager;
        _logger = logger;
    }

}
Signup method
Create a post method named Signup.
[HttpPost("signup")]
public async Task<IActionResult> Signup(SignupModel model)
{
    try
    {
        var existingUser = await _userManager.FindByNameAsync(model.Email);
        if (existingUser != null)
        {
            return BadRequest("User already exists");
        }

        // Create User role if it doesn't exist
        if ((await _roleManager.RoleExistsAsync(Roles.User)) == false)
        {
            var roleResult = await _roleManager
                  .CreateAsync(new IdentityRole(Roles.User));

            if (roleResult.Succeeded == false)
            {
                var roleErros = roleResult.Errors.Select(e => e.Description);
                _logger.LogError($"Failed to create user role. Errors : {string.Join(",", roleErros)}");
                return BadRequest($"Failed to create user role. Errors : {string.Join(",", roleErros)}");
            }
        }

        ApplicationUser user = new()
        {
            Email = model.Email,
            SecurityStamp = Guid.NewGuid().ToString(),
            UserName = model.Email,
            Name = model.Name,
            EmailConfirmed = true
        };

        // Attempt to create a user
        var createUserResult = await _userManager.CreateAsync(user, model.Password);

        // Validate user creation. If user is not created, log the error and
        // return the BadRequest along with the errors
        if (createUserResult.Succeeded == false)
        {
            var errors = createUserResult.Errors.Select(e => e.Description);
            _logger.LogError(
                $"Failed to create user. Errors: {string.Join(", ", errors)}"
            );
            return BadRequest($"Failed to create user. Errors: {string.Join(", ", errors)}");
        }

        // adding role to user
        var addUserToRoleResult = await _userManager.AddToRoleAsync(user: user, role: Roles.User);

        if (addUserToRoleResult.Succeeded == false)
        {
            var errors = addUserToRoleResult.Errors.Select(e => e.Description);
            _logger.LogError($"Failed to add role to the user. Errors : {string.Join(",", errors)}");
        }
        return CreatedAtAction(nameof(Signup), null);
    }
    catch (Exception ex)
    {
        return StatusCode(StatusCodes.Status500InternalServerError, ex.Message);
    }
}
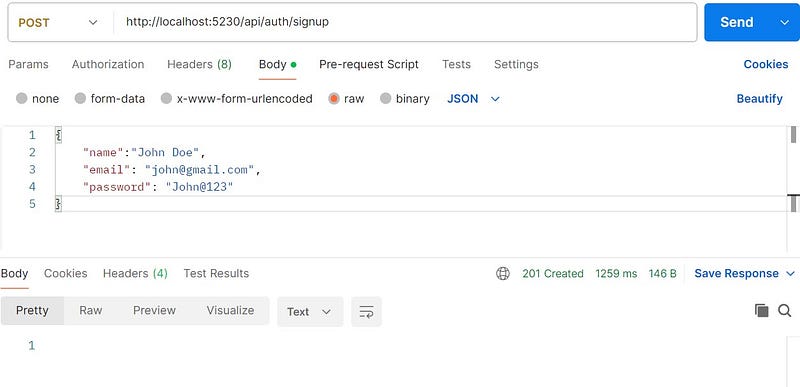
Let’s test this method in the postman.
Token Service
Create a new folder named Services. Withing the folder named Services, create a new interface named ITokenService.
public interface ITokenService
{
    string GenerateAccessToken(IEnumerable<Claim> claims);
    string GenerateRefreshToken();
    ClaimsPrincipal GetPrincipalFromExpiredToken(string accessToken);
}
Within the folder named Services, create a new class named TokenService. Inject the IConfiguration service to the TokenService class.
public class TokenService : ITokenService
{
    private readonly IConfiguration _configuration;
    public TokenService(IConfiguration configuration)
    {
        _configuration = configuration;
    }
}
Implement the GenerateAccessToken method.
public string GenerateAccessToken(IEnumerable<Claim> claims)
{
    var tokenHandler = new JwtSecurityTokenHandler();

    // Create a symmetric security key using the secret key from the configuration.
    var authSigningKey = new SymmetricSecurityKey
                    (Encoding.UTF8.GetBytes(_configuration["JWT:Secret"]));

    var tokenDescriptor = new SecurityTokenDescriptor
    {
        Issuer = _configuration["JWT:ValidIssuer"],
        Audience = _configuration["JWT:ValidAudience"],
        Subject = new ClaimsIdentity(claims),
        Expires = DateTime.Now.AddMinutes(15),
        SigningCredentials = new SigningCredentials
                      (authSigningKey, SecurityAlgorithms.HmacSha256)
    };

    var token = tokenHandler.CreateToken(tokenDescriptor);

    return tokenHandler.WriteToken(token);

}
Implement the GenerateRefreshToken method.
public string GenerateRefreshToken()
{
    // Create a 32-byte array to hold cryptographically secure random bytes
    var randomNumber = new byte[32];

    // Use a cryptographically secure random number generator
    // to fill the byte array with random values
    using var randomNumberGenerator = RandomNumberGenerator.Create();
    randomNumberGenerator.GetBytes(randomNumber);

    // Convert the random bytes to a base64 encoded string
    return Convert.ToBase64String(randomNumber);
}
Implement the GetPrincipalFromExpiredToken method. As name suggest we will get principal from the expired token with the help of this method.
public ClaimsPrincipal GetPrincipalFromExpiredToken(string accessToken)
{
    // Define the token validation parameters used to validate the token.
    var tokenValidationParameters = new TokenValidationParameters
    {
        ValidateIssuer = true,
        ValidateAudience = true,
        ValidAudience = _configuration["JWT:ValidAudience"],
        ValidIssuer = _configuration["JWT:ValidIssuer"],
        ValidateLifetime = false,
        ClockSkew = TimeSpan.Zero,
        IssuerSigningKey = new SymmetricSecurityKey
        (Encoding.UTF8.GetBytes(_configuration["JWT:secret"]))
    };

    var tokenHandler = new JwtSecurityTokenHandler();

    // Validate the token and extract the claims principal and the security token.
    var principal = tokenHandler.ValidateToken(accessToken, tokenValidationParameters, out SecurityToken securityToken);

    // Cast the security token to a JwtSecurityToken for further validation.

    var jwtSecurityToken = securityToken as JwtSecurityToken;

    // Ensure the token is a valid JWT and uses the HmacSha256 signing algorithm.
    // If no throw new SecurityTokenException
    if (jwtSecurityToken == null || !jwtSecurityToken.Header.Alg.Equals
    (SecurityAlgorithms.HmacSha256,StringComparison.InvariantCultureIgnoreCase))
    {
        throw new SecurityTokenException("Invalid token");
    }

    // return the principal
    return principal;
}
Now register this service.
// Program.cs
builder.Services.AddScoped<ITokenService, TokenService>();
Token Model
Within the folder named DTOs, create a new class named TokenModel.
public class TokenModel
{
    [Required]
    public string AccessToken { get; set; } = string.Empty;

    [Required]
    public string RefreshToken { get; set; } = string.Empty;
}
Login
Open the AuthController and inject the ITokenService and AppDbContext to it.
public class AuthController : ControllerBase
{
    private readonly UserManager<ApplicationUser> _userManager;
    private readonly RoleManager<IdentityRole> _roleManager;
    private readonly ILogger<AuthController> _logger;
    private readonly ITokenService _tokenService; // new code
    private readonly AppDbContext _context; // new code

    public AuthController(UserManager<ApplicationUser> userManager,
                 RoleManager<IdentityRole> roleManager,
                 ILogger<AuthController> logger,
                 ITokenService tokenService, AppDbContext context)
    {
        _userManager = userManager;
        _roleManager = roleManager;
        _logger = logger;
        _tokenService = tokenService;  // new code
        _context = context; // new code

    }
}
Now we need to implement the Login method.
[HttpPost("login")]
public async Task<IActionResult> Login(LoginModel model)
{
    try
    {
        var user = await _userManager.FindByNameAsync(model.Username);
        if (user == null)
        {
            return BadRequest("User with this username is not registered with us.");
        }

        bool isValidPassword = await _userManager.CheckPasswordAsync(user, model.Password);
        if (isValidPassword == false)
        {
            return Unauthorized();
        }

        // creating the necessary claims
        List<Claim> authClaims = [
                new (ClaimTypes.Name, user.UserName),
                new (JwtRegisteredClaimNames.Jti, Guid.NewGuid().ToString()),
                // unique id for token
        ];

        var userRoles = await _userManager.GetRolesAsync(user);

        // adding roles to the claims. So that we can get the user role from the token.
        foreach (var userRole in userRoles)
        {
            authClaims.Add(new Claim(ClaimTypes.Role, userRole));
        }

        // generating access token
        var token = _tokenService.GenerateAccessToken(authClaims);

        string refreshToken = _tokenService.GenerateRefreshToken();

        //save refreshToken with exp date in the database
        var tokenInfo = _context.TokenInfos.
                    FirstOrDefault(a => a.Username == user.UserName);

        // If tokenInfo is null for the user, create a new one
        if (tokenInfo == null)
        {
            var ti = new TokenInfo
            {
                Username = user.UserName,
                RefreshToken = refreshToken,
                ExpiredAt = DateTime.UtcNow.AddDays(7)
            };
            _context.TokenInfos.Add(ti);
        }
        // Else, update the refresh token and expiration
        else
        {
            tokenInfo.RefreshToken = refreshToken;
            tokenInfo.ExpiredAt = DateTime.UtcNow.AddDays(7);
        }

        await _context.SaveChangesAsync();

        return Ok(new TokenModel
        {
            AccessToken = token,
            RefreshToken = refreshToken
        });
    }
    catch (Exception ex)
    {
        _logger.LogError(ex.Message);
        return Unauthorized();
    }
}
Code is self explanatory itself but I want to explain few things.
Claim
A claim represents a piece of information about a user, which is essentially a name-value pair that provides additional information about an entity. Claims are present in the tokens. Example
// Built-in Claim Types
new Claim(ClaimTypes.Name, "johndoe") // Username
new Claim(ClaimTypes.Email, "john@example.com") // Email address
new Claim(ClaimTypes.Role, "Admin") // User role
// Cusom claim
new Claim("Department", "IT") // Custom claim
Claim type JTI
jti stands for “JWT ID” is a unique identifier for the JWT. It is a optional claim but is recommended to include. Its value must be a unique string. It helps to prevent replay-attack, where an attacker attempt to use previously issued token to access the unauthorized resources. [Source]
Testing login endpoint
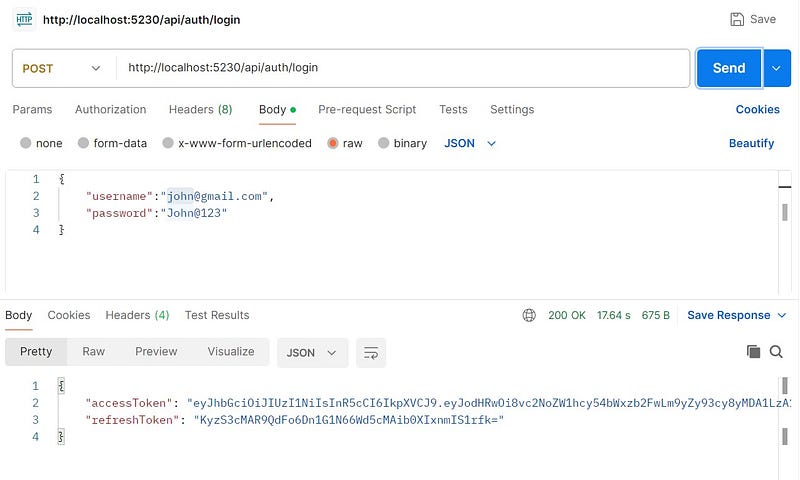
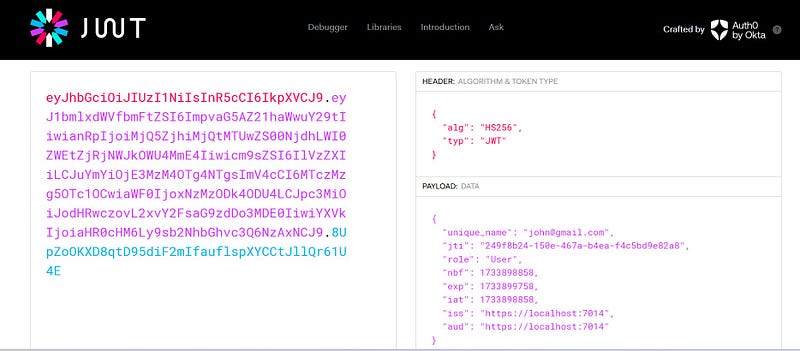
JWT is url-safe Base64 string, you can decode and check it’s payload in the https://jwt.io/.
Refresh endpoint
Implement a method named Refresh in the AuthController.
[HttpPost("token/refresh")]
public async Task<IActionResult> Refresh(TokenModel tokenModel)
{
    try
    {
        var principal = _tokenService.GetPrincipalFromExpiredToken(tokenModel.AccessToken);
        var username = principal.Identity.Name;

        var tokenInfo = _context.TokenInfos.SingleOrDefault(u => u.Username == username);
        if (tokenInfo == null
            || tokenInfo.RefreshToken != tokenModel.RefreshToken
            || tokenInfo.ExpiredAt <= DateTime.UtcNow)
        {
            return BadRequest("Invalid refresh token. Please login again.");
        }

        var newAccessToken = _tokenService.GenerateAccessToken(principal.Claims);
        var newRefreshToken = _tokenService.GenerateRefreshToken();

        tokenInfo.RefreshToken = newRefreshToken; // rotating the refresh token
        await _context.SaveChangesAsync();

        return Ok(new TokenModel
        {
            AccessToken = newAccessToken,
            RefreshToken = newRefreshToken
        });
    }
    catch (Exception ex)
    {
        _logger.LogError(ex.Message);
        return StatusCode(StatusCodes.Status500InternalServerError);
    }
}
Let’s understand the logic.
- First we get principal from the expired token. Principal contains the claims information.
- From the principal we can extract the Username.
- With the help of username, we can retrieve the token info.
- If tokenInfo is null or refresh token present in the database and the refresh token passed to the method does not match or refresh token is expired then we returns the bad request along with the message “Invalid refresh token. Please login again.”
- Generate the new access token and new refresh token.
- Update the refresh token in the database. In this way we can rotate the refresh token and mitigate the risk of token theft.
- Return the recently generated access and refresh token.
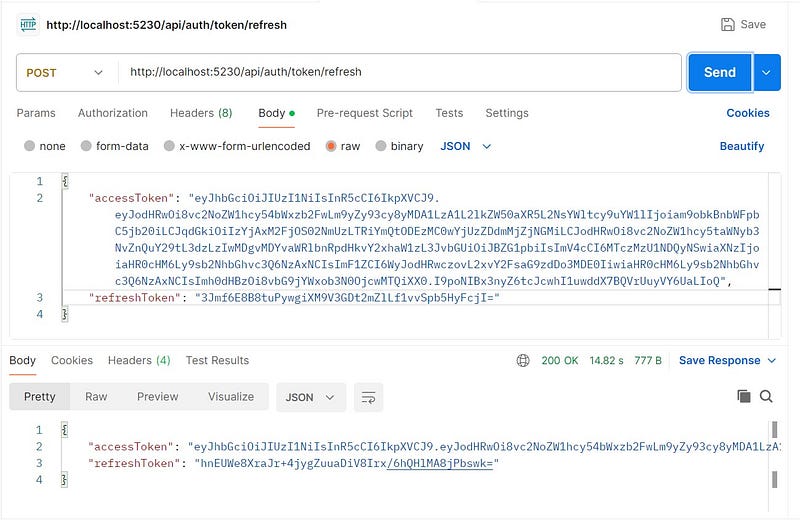
Now, we do not need to call login API to get the access token until the refresh token gets expired (It is valid for 7 days in our case). We need to call the http://localhost:5230/api/auth/token/refresh endpoint to get the access token.
Testing the refresh endpoint
How to protect the resources?
With controller APIs, you can protect the resources in two ways.
1. Controller Method level
Need to put [Authorize] attribute above every method.
[ApiController]
[Route("api/[controller]")]
public class PeopleController : ControllerBase
{

    [HttpGet]
    [Authorize]
    public IActionResult Get()
    {
        return Ok();
    }

    [HttpPost]
    [Authorize]
    public IActionResult Post()
    {
        return Ok();
    }

}
2. Controller level
Need to put [Authorize] attribute above the controller.
[ApiController]
[Route("api/[controller]")]
[Authorize]
public class PeopleController : ControllerBase
{

    [HttpGet]
    public IActionResult Get()
    {
        return Ok();
    }

    [HttpPost]
    public IActionResult Post()
    {
        return Ok();
    }

}
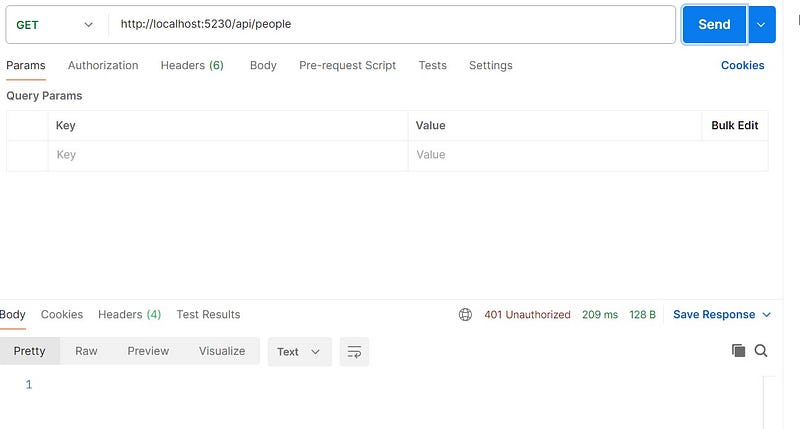
In this way every method of the controller is authorized. If you try to access any of these method, you will get 401 Unauthorized status code.
What if, you don’t want to protect some resource?
If you are authorizing on controller level and you do not want to authorize some methods on that controller, then you need to put the [Allowanonymous] attribute on that method.
[ApiController]
[Route("api/[controller]")]
[Authorize]
public class PeopleController : ControllerBase
{

    // this method can be accessed by any one
    [HttpGet]
    [AllowAnonymous]
    public IActionResult Get()
    {
        return Ok();
    }

    [HttpPost]
    public IActionResult Post()
    {
        return Ok();
    }

}
Accessing the protected resource
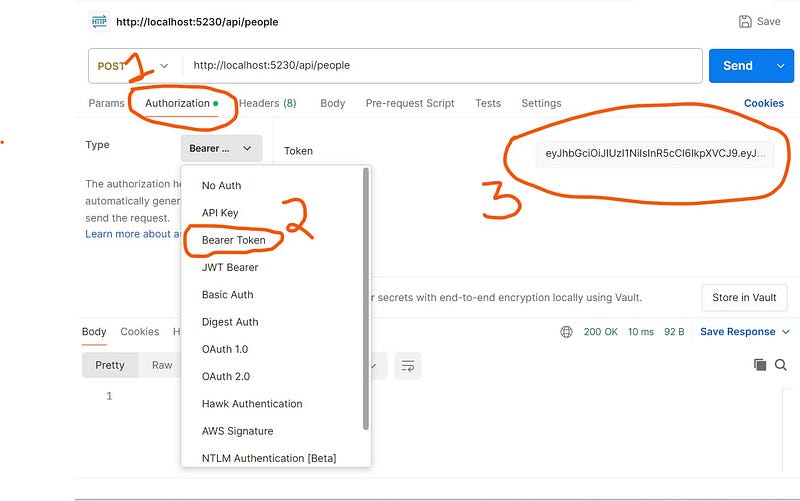
If you are using postman, then follow these steps.
- Hit the login api and copy the “accessToken”.
- Now open a new tab and enter this url http://localhost:5230/api/people of post type.
- Select the tab named “Authorization”.
- Select the type named “Bearer token”.
- Paste the value of accessToken within the Token’s textbox.
Role base authorization
Till now, we have gone through the authentication process. Authentication means “Who you are?”. For authentication you just need to log in to the system. Even you are an authenticated user, it does not mean you can access all the resources. Let’s say we have a post end point that only admin can access. To access this resource you have to log in with Admin’s credentials. It is called authorization. Basically authorization is what can you access.
You can protect your resources on the basis of role(s) by using the attribute [Authorize(Roles = “role name”)]. We can also define multiple roles like this- [Authorize(Roles = “role1,role2”)].
    [HttpPost]
    [Authorize(Roles = Roles.Admin)]
    public IActionResult Post()
    {
        return Ok();
    }
If you try to access this resource with role named User, you will get 403 forbidden status code in response.

Revoking the refresh token
There might be a situation when one wants to invalidate the refresh token. Situations like:
- When users logs out, you want to invalidate their refresh token.
- If a refresh token is compromised (stolen or leaked), revoking it prevents unauthorized access.
Implement a method named Revoke in the AuthController.
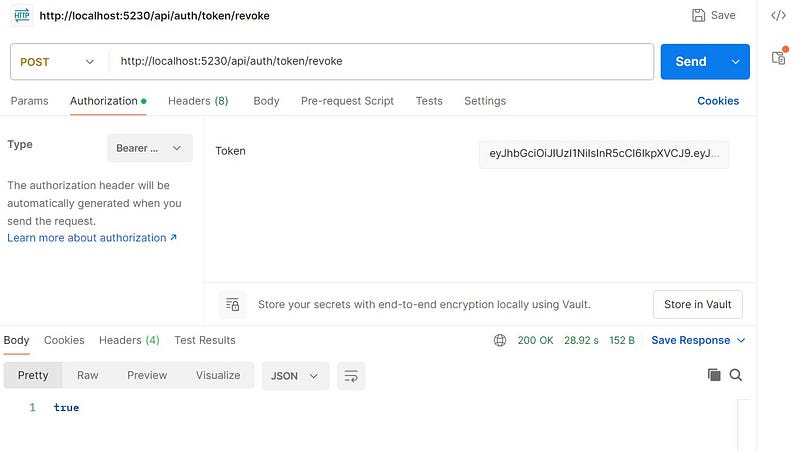
[HttpPost("token/revoke")]
[Authorize]
public async Task<IActionResult> Revoke()
{
    try
    {
        var username = User.Identity.Name;

        var user = _context.TokenInfos.SingleOrDefault(u => u.Username == username);
        if (user == null)
        {
            return BadRequest();
        }

        user.RefreshToken = string.Empty;
        await _context.SaveChangesAsync();

        return Ok(true);
    }
    catch (Exception ex)
    {
        _logger.LogError(ex.Message);
        return StatusCode(StatusCodes.Status500InternalServerError);
    }

}
Make sure this method have [Authorized] attribute, otherwise you won’t get the value of User.Identity.Name.
Revoke token test